Preserve Vital Online Content With Bellingcat's Auto Archiver
Open source research often relies on social media posts that contain videos and images. However, these posts can be taken down by platforms or deleted by those posting them. That’s why we at Bellingcat created a tool — the Auto Archiver — to help the open-source community, as well as journalists and researchers, easily archive online content. The tool allows for posts, and their video or visual attachments, to be archived by simply entering a link into a Google Sheets document.
We have previously written on how to manually archive open source materials, as well as specifically Telegram content. These methods are of particular relevance amidst Russia’s ongoing invasion of Ukraine. Our Auto Archiver complements those practices by creating a uniform and streamlined archiving process regardless of platform or media type.
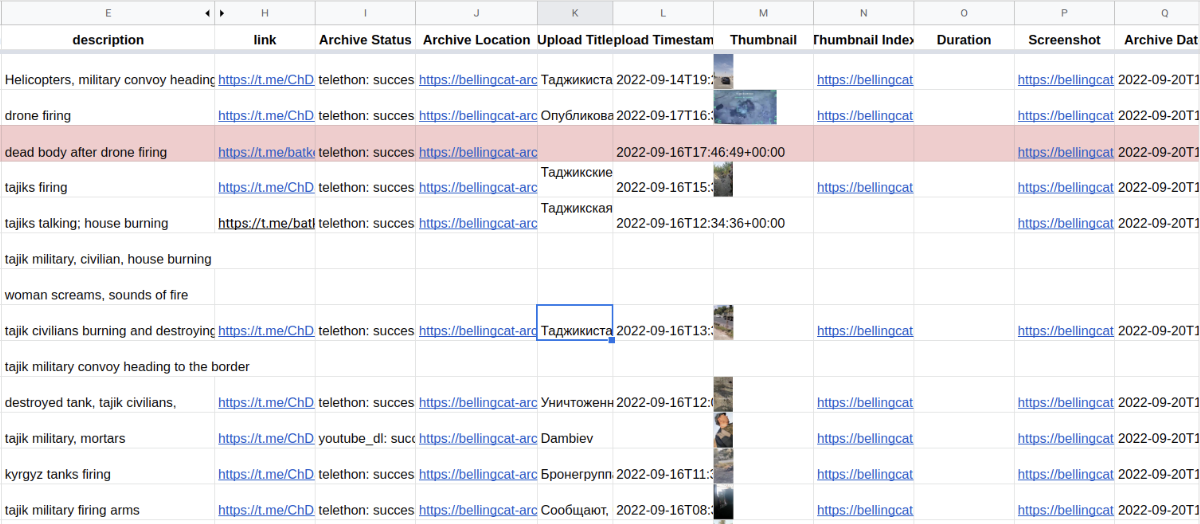
The Auto Archiver is an ongoing project first created by Bellingcat data scientist, Logan Williams, with Bellingcat’s Investigative Tech Team and our community contributors now regularly working to make improvements to the software. So far, we’ve used it to capture content depicting incidents of civilian harm during Russia’s invasion of Ukraine as well as in other rapidly-evolving situations like the Tajik-Kyrgyz border conflict of September 2022.
But it’s not just Bellingcat that has been using the Auto Archiver — organisations like the Centre for Information Resilience and OSR 4 Rights have also used it to help their researchers systematically archive content from ongoing conflict situations. OSR 4 Rights even provides an online form to test the Archiver on a link via their website.
Depending on your level of technical knowledge, setting up the Auto Archiver might seem intimidating at first. But don’t worry — by the end of this article we’ll have explained how to get started with the Auto Archiver.
What can the Auto Archiver do?
Before we dive into how to set it up, let’s look at the basics of how the Auto Archiver works.
The tool is essentially a one-stop shop for your archiving needs. Let’s say there’s a piece of content online you’d like to archive, a web page or a social media post with videos and images: all you have to do is grab its URL and input it into a new row on the Google Spreadsheet where the Auto Archiver has been instructed to look for links. When the Auto Archiver sees a link that hasn’t been archived yet — or, in other words, has an empty status in their respective cell in the sheet — it is programmed to look for the best archiving strategy. This depends on the inputted platform and content type. Since platforms have different formats and barriers, the Auto Archiver combines existing video downloading tools like yt-dlp — a command-line tool that allows you to download YouTube videos — with individual social media archiving tools.
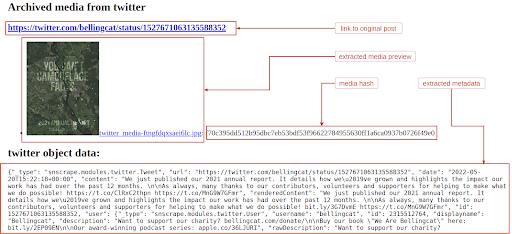
At the time of writing, these exist for Telegram, Tiktok, Twitter, and VKontakte. If all of those fail, the link is submitted to the Wayback Machine. However, this means any video content will likely not be archived (one of the limitations of using the Wayback Machine alone for online preservation) and it should be viewed as a limited fallback mechanism. The Auto Archiver always takes a screenshot of the content and will append it to the link row when configured to do so, along with the archived content itself and other metadata pertaining to the archived content.
Getting Started With the Tool
While the Auto Archiver is very easy to use once it has been set-up, there are a few steps to go through that require small aspects of technical knowledge before you can begin using it.
We walk through how to set up the Auto Archiver in more thorough detail in our GitHub code repository. But we’ll run through some of the basics below. Don’t forget to watch the video embedded below as well.
All you need to start is a computer — any computer, from your personal laptop to a hulking gaming PC — with internet access. From there, there’s a few other things you’ll need:
- A configuration file describing how and where to archive content (discussed in the following section)
- A Google Service Account is the only service configuration strictly needed for the Archiver to work; this is a special type of Google Account for non-human users (ie an automated application). In this case, the Archiver is the non-human user, interacting with a Google Sheet. When deploying the Archiver to a new sheet, it is always necessary to give editor rights to the email address created for the Service Account. This link explains how you can set one up.
- Installation of Python 3.8 or above
- ffmpeg (for video operations like capturing thumbnails)
- Firefox and Geckodriver (to take screenshots of webpages)
Once you’ve got this set up, you can call the Archiver from the command line which will connect to the configured Google Spreadsheet and start archiving. This step essentially consists of pasting the correct instructions in the command line, which is accessible by pressing command + space on a Mac and then typing “terminal”. On a Windows computer, press the Windows key + X before clicking the “Command line” or “Powershell” option. In this instance, the instruction to enter into the command line is:
python auto_archive.py --config your-config-file.yaml
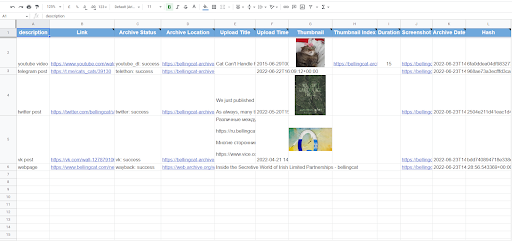
Your computer will now get to work and will expect to find a header row with two mandatory columns on the relevant spreadsheet: one to read links from, one to display the archiving status. Other columns are optional but provide features that improve the usability of the archived content, including:
- Link to the archived content
- Link to a screenshot of the webpage
- Title of the web page or post
- Upload time of the post
- Archive process timestamp
- Cryptographic hash of the content – useful to later test for tampering. However, note that merely storing this value in a Google Sheet does not necessarily meet all forensic requirements for later use of the video in legal proceedings
- If a video is present
- Thumbnail of a video
- Frame thumbnails along the video
- Duration of the video
Configuration and Services Keys
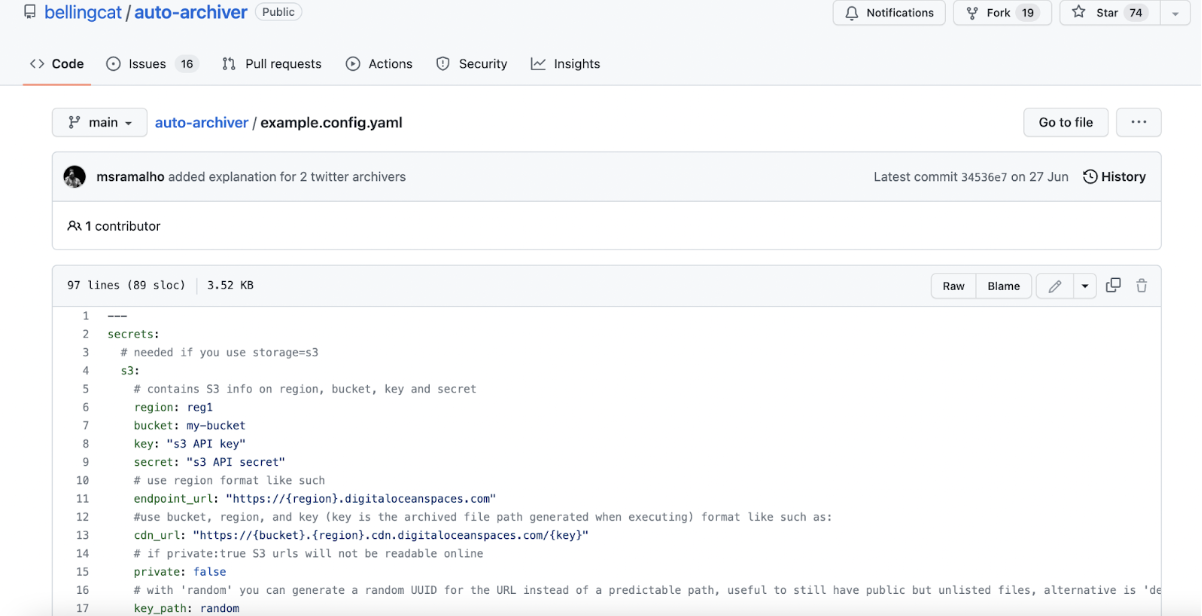
There is an example configuration file available in our GitHub repository, which can be used as a starting point for new deployments of the Auto Archiver. This file is where the execution is configured — in other words, details of how the Archiver is set up — where you can select a storage option (discussed below), where the API keys and secrets for services like the Wayback Machine are stored, and also where alternative names for the columns can be specified should a user wish to rename their own columns.

A screen grab from Bellingcat’s GitHub page that details configuration code and the services it makes use of.
Modifying column names has proven useful when the Auto Archiver is added to a sheet after people start working on it, and column names have already been predefined. If you want to start from an empty sheet you can make use of this template; it’s already aligned with the default column names in the example configuration file. A storage configuration is always required to ensure the content is saved, but local storage can be used to quick-start the tool testing. Further details on storage options available with Auto Archiver are detailed in the following sections of this article.
In order to make use of custom social media archivers, there’s also a few other things you’ll need to do. You’ll need a valid VKontakte username and password, Telegram API keys and a bot token, and a Twitter API V2 bearer token. Do avoid using personal accounts for both security and practical reasons, as these can be suspended due to automatic control systems and are always under higher risk of being read from configuration files.
For the fallback archiver, an account at the Internet Archive is needed before retrieving the secrets for the Wayback Machine API.
Although providing the above credentials is optional and not necessary for the Auto Archiver to function, it’s a step that increases the type of content that can be retrieved and preserved. Again though, this may be a process that is more relevant for more technically proficient users and may spring from your particular archiving needs.
It is also possible to archive multiple sheets with the same configuration file and external services keys: by overriding the name of the sheet to look for via the command line options (using this command: python auto_archive.py –config your-config-file.yaml –sheet “my sheet name”), or by creating a new configuration file if different storages or secrets are used.
How is the Content Secured?
The content found by the Archiver will be copied to the configured storage — that is, the storage space you’ll have set up on the configuration file. There are currently three storage options: a Google Drive folder, an external online object store like an S3 bucket (e.g. Digital Ocean Spaces or Amazon S3) or the local storage in the machine where the Archiver is running.
Access to the archived material can be limited by making the storage location private or restricted. If using S3 storage, set the private configuration option in the configuration file. If using Google Drive, manage the access as you would to any other Drive folder.
By default, files are stored with a predictable path and name, but using the “random” naming setting in the configuration file you will get a long and unpredictable string instead. This option can be used to share archived content online, since only people with access to the links can view it.
Automation and Performance
Once the Auto Archiver finishes going through a sheet it will halt its execution, so any links added afterwards will not be archived. The simplest way to address this is scheduling a task on your computer. On Windows, this can be done via Scheduled Tasks in the Control Panel. On Mac or Linux machines, you can use a cron — a command line tool to schedule recurring tasks— to run it how often you need, an example crontab entry to run the Archiver every 10 minutes would look like:
10 * * * * python auto_archive.py --config your-config-file.yaml
Since Russia invaded Ukraine in February 2022, we’ve archived thousands of online pages, videos, and images of the ongoing war. This growing archive is used for current and continued investigation efforts, but it will also serve as a long-lasting archive of the atrocities of this war. This is an approach we encourage the broader open-source community to replicate with other conflicts and situations, particularly those where there’s limited public interest at present. Doing so, ensures future accountability processes will have enough open source materials to document and investigate.
Our interactive TimeMap feature, which is embedded below and logs incidents of civilian harm that occurred during the war in Ukraine makes use of the Auto Archiver – although it must be noted we don’t display all of the archived content publicly in order to protect the privacy of some uploaders and because our investigators still need to verify the incidents recorded on the sheet before they can be added to the map.
A complete installation and deployment walkthrough can be found in the code repository, and we welcome feedback and questions which you can submit as GitHub issues or by contacting the Bellingcat Investigative Tech Team via this contact form.
Bellingcat is a non-profit and the ability to carry out our work is dependent on the kind support of individual donors. If you would like to support our work, you can do so here. You can also subscribe to our Patreon channel here. Subscribe to our Newsletter and follow us on Twitter here.


