Automatically Finding Weapons in Social Media Images Part 1
This article was originally published on the AutomatingOSINT.com blog.
As part of my previous post on gangs in Detroit, one thing had struck me: there are an awful lot of guns being waved around on social media. Shocker, I know. More importantly I began to wonder if there wasn’t a way to automatically identify when a social media post has guns or other weapons contained in them. This post will cover how to use a couple of techniques to send images to the Imagga API that will automatically tag pictures with keywords that it feels accurately describe some of the objects contained within the picture. As well, I will teach you how to use some slicing and dicing techniques in Python to help increase the accuracy of the tagging. Keep in mind that I am specifically looking for guns or firearm-related keywords, but you can easily just change the list of keywords you are interested in and try to find other things of interest like tanks, or rockets.
This blog post will cover how to handle the image tagging portion of this task. In a follow up post I will cover how to pull down all Tweets from an account and extract all the images that the user has posted (something my students do all the time!).
Prerequisites
The Python module that I use for this post has some specific installation instructions that you should follow here. Make sure you click the “Python (v2)” tab in the instructions and that you follow them carefully. We are also going to use an image manipulation library called Pillow which you can install like so:
pip install Pillow
Finding Your Tags
The first step I did when I first started trying this was to push some pictures to the Imagga website that contained only weapons. So for example you could do a Google Image search for “AK-47” or “pistol” and download a few images. Then submit them to Imagga tagging demo here and see what the tagging results are:

So you can make a note of which keywords fit for a number of different test images. Of course you can adapt my methodology or the script to suit any particular use case that you might have but this is precisely what I did to start out.
Some More Challenging Photos
This works fine and dandy for identifying a positive sample that does not include any background imagery, or for example someone holding a gun. This gentleman was found during my gangs of Detroit research:

Now I can appreciate that this image tagging technology is really doing its best when there are a pile of things going on in this photograph (look closely). However, you will notice that it did not detect any firearms or weapons related images. One theory I had (along with David Benford from Blackstage Forensics) was to chop the image up so that you had a higher possibility of isolating the weapon in the picture:

This appeared to work for this image however I also found that chopping images horizontally (depending on the orientation of the weapon) was also useful in some cases. Of course we are not going to be manually chopping up each image before testing it. That’s what code is for my friends.
Coding It Up
So we have a couple of things we want to accomplish. We want to be able to feed in an image to our script and have the script chop it up into thirds both vertically and horizontally. Next we want to submit the image to Imagga using their API and then test the results against our list of tags. Let’s open up a new Python script called gunhunter.py and start punching in the following code:
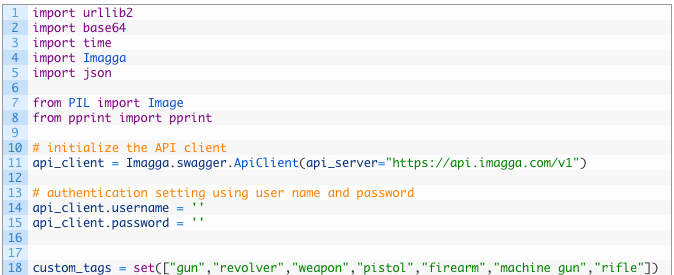
Most of this code is just imports and setting our username and password for the Imagga API access. The only thing to take note of is on line 18 where we are setting our list of tags that we are going to use to determine whether we have a successful hit or not. With the Imagga API we have to first upload an image which returns back a content_id that we have to use in subsequent API calls. Let’s add this function now:

Let’s examine this little snippet of code:
- Line 25: we define our upload_file function to receive a file_path parameter that is the local file on disk.
- Line 26: initialize the Imagga ContentAPI class passing in our api_client variable that contains our authentication pieces.
- Line 27: we utilize the upload function to push the file up to Imagga’s server.
- Line 29: if we have a successful response we send back the content ID of the file. If the upload failed we will return None.
Perfect, this will take care of getting the file up to Imagga. Now that we have a content ID we need to do a second call to get Imagga’s tagging engine to actually analyze the image and give us the results back. Go forth and implement this function now:
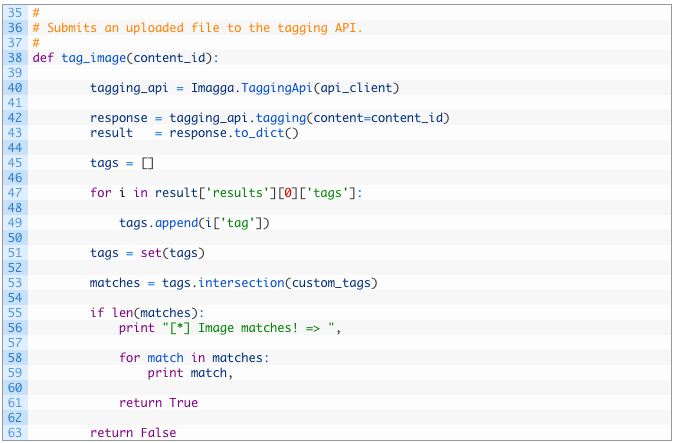
Let’s break this down:
- Line 38: define the tag_image function to take in the content_id that was returned from the upload_file function we previously coded.
- Lines 40-43: we initialize the TaggingApi class (40) and then call the tagging function (42) passing the content_id. We then get the response back and call the to_dict (43) function to convert the response to a dictionary.
- Lines 45-49: initialize an empty list to hold the tags (45) and then iterate over the tags returned from Imagga (47) and add them to our list (49). Of course we could just test each tag against our list of tags, but I do it like this in order for you to be able to extend the functionality at this point (such as storing all tagged results in Elasticsearch).
- Lines 51-53: we convert our list to a Python set and then use the intersection function (53) which will tell us which items are in both sets.
- Lines 55-63: if there is a list of matches (55) we print out the tags that were associated to the image we were interested in (56-59) and return True (61). If there were no matches we return False (63).
That concludes our work that is required to deal with Imagga. Now let’s start working on our function that will split the image both horizontally and vertically.

Let’s break this down a little bit:
- Line 68: define our split_image function that takes in the path to the image we are chopping up.
- Line 70: we are just pulling the file extension off of the file name.
- Lines 72-73: load up the image into Pillow (72) and then we grab the width and height of the image so that we know where to split (73).
- Lines 75-76: we calculate the size of our image chunks by simply dividing the total width and height by 3.
Now let’s implement the logic that will extract each chunk of the image and get it ready for submission to Imagga. Add the following code, being mindful of the indentation of course!
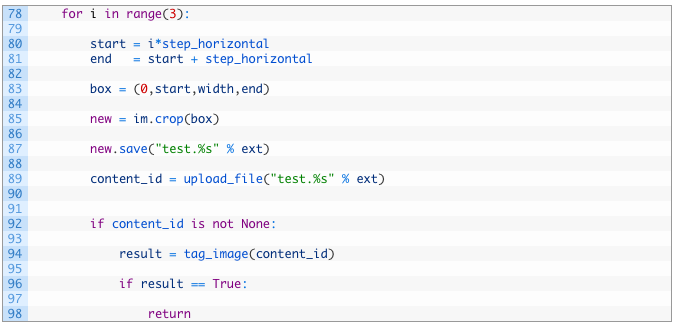
Let’s take a look at this chunk of code we have just written. This is the piece that will chop the image into three chunks vertically:
- Line 78: we are starting a loop that will count to three seeing as we are chopping the image into thirds.
- Line 80: calculate the first step of where we are going to start our chunk.
- Line 81: calculate the end of our chunk.
- Line 83: set a cropping box that uses the points that we have calculated for our cropping.
- Line 85: using Pillow we now pass in our box variable to the crop function. This will extract a chunk of the image based on our calculations.
- Line 87: now we save the resulting chunk as a temporary image we just name test.EXT where EXT is the file extension of our original file that we passed in.
- Line 89: here we pass in our temporary file to our upload_file function to send it to Imagga.
- Lines 92-98: if the upload is successful (92) we will receive a content_id back from the Imagga servers which we then pass to the Imagga tagging API (94). If the image is tagged with a tag we are looking for we stop the process and return (98).
Whew! Ok we are nearly done. We have dealt with chopping the image vertically, so now let’s pound out the required code to chop the file horizontally. This is much the same as the code before, except we are now stepping DOWN the image, instead of stepping to the right in order to calculate our cropping box. Get typing!
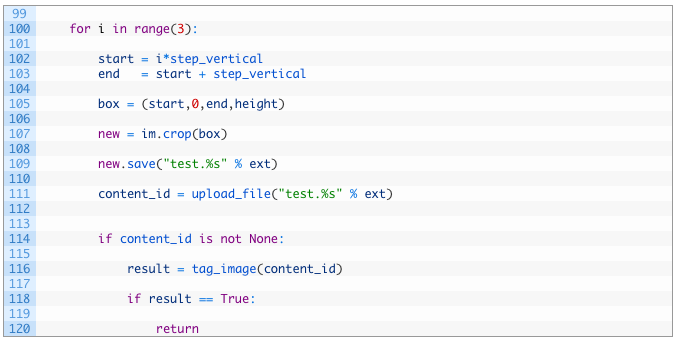
No need to review this code as it is nearly identical to our previous section. Now for our final function to put in place which will be responsible for kicking off the entire process.
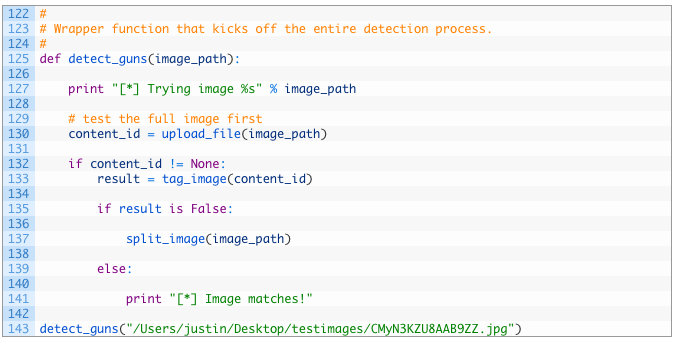
Almost there folks!
- Line 125: first we define our detect_guns function that takes in the path to the image file.
- Lines 130-137: we first upload the full file to Imagga without cropping it (130-135) but if there is no match in the full file we then kick off our cropping routine (137).
- Lines 139-141: if there was a match we then simply print out a message that we had a match and exit.
The last line just calls the function passing in an image on your hard drive. Now go out and do some searches on Google for guns or related terms including military terms. Download a test image and..
Let It Rip
If you want to use the image from above, you can grab it (while the Tweet still lives that is) from here:
#FreeLilBro pic.twitter.com/fWnNEZbuVA
— #⃣BadNews (@SikDrive_CORN) August 19, 2015
Run that through your script and you should see some output like so:
[*] Trying image /Users/justin/Desktop/testimages/CMyN3KZU8AAB9ZZ.jpg
[*] Image matches! => weapon
Perfect! Although this script does not do the work for downloading the images from Twitter, this technique can still be useful if you have a folder full of images that you want to run through the system or if you are looking to train it on other interesting things such as military equipment in war zones. In a future post we will cover how to use the Twitter API (adapted from my course) to pick an account and download all available images and automatically submit them to Imagga. Keep in mind that for each image you will have up to 7 Imagga API requests.
